• Skip to primary navigation
  • Skip to main content
  • Skip to primary sidebar
  • Read An Issue
  • About
  • Advertising Information
  • Where to Find the Reader
  • Subscribe to our Mailing List
  • Contact Us

Park Slope Reader

  • The Reader Interview
  • Eat Local
  • Dispatches From Babyville
  • Park Slope Life
  • Reader Profile
  • Slope Survey

Recipes

Olivia’s Kitchen: Easy, Delicious Homemade Flat Bread Sandwich

June 12, 2018 By Olivia Williamson Filed Under: Olivia’s Kitchen, Recipes Tagged With: cooking, easy, fresh, healthy, ingredients, local, olivia williamson, recipe, sandwich, snack

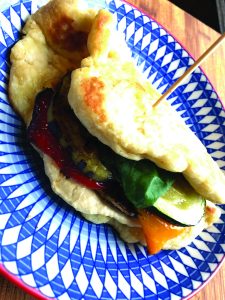
It may sound intimidating to make your own flat bread but this recipe is actually incredibly simple and has a big pay off.  The recipe below is for a vegetarian version of a sandwich, but you can add some chicken or lamb with it for other delicious options.


Ingredients

1 1/2 cups of Flour

2 teaspoons of Baking Powder

1/4 teaspoon of Salt

1 1/4 cups of Whole Milk Greek Yogurt (it’s important to use full fat)

2 Tablespoons of Olive Oil

One medium Zucchini

One small Eggplant

One Red Bell Pepper

One Yellow Squash

Two Tablespoons of Olive Oil

Salt and Pepper

One Clove of Garlic

4-6 large leaves of Fresh Basil

Hummus


Recipe

Place the flour, baking powder, salt and yogurt in a large bowl and mix with a rubber spatula until a moist, shaggy dough forms. Dust a work surface with flour. Transfer the dough onto the work surface, sprinkle with more flour, and knead until smooth, 8 to 10 kneads.Divide the dough into 4 portions and roll each into a ball about 3 inches wide. Cover loosely with plastic wrap and let rest for 20 minutes. Heat a griddle, grill pan, 12-inch cast iron skillet, or nonstick frying pan over medium-high heat until a drop of water immediately sizzles on contact. Meanwhile, roll out the dough.Generously dust a work surface and rolling pin with flour. Roll 1 ball of dough into a 9-inch round about 1/8-inch thick, dusting with more flour as needed to prevent sticking.Brush the pan with a thin layer of oil or use a paper towel to coat the pan with a thin layer of oil. Place the flatbread in the pan and brush the top with a thin layer of oil. Cook until puffed and golden-brown in spots, 2 to 3 minutes per side. Remove to a cutting board.While the first flatbread is cooking, roll out the next ball of dough. Cook the remaining flatbreads, making sure to brush the pan and top of the flatbreads with oil each time.

Cut all the vegetable into thin (1/4 inch) thin slices.   Crush the garlic clove.  Toss the vegetables, garlic clove and some salt and pepper in a bowl with the olive oil.  Spread out in one layer on a sheet pan and place in a 400 degree oven and roast until browned, turning once.  Should take between 15 and 20 minutes.

To assemble the sandwich spread a generous layer of hummus on the flatbread.  Layer the roasted vegetables on the hummus and top with the fresh basil leaf.

Filed Under: Olivia’s Kitchen, Recipes Tagged With: cooking, easy, fresh, healthy, ingredients, local, olivia williamson, recipe, sandwich, snack

Eating Local: Four & Twenty Blackbirds: Strawberry Balsamic Pie

June 7, 2018 By Katrina Yentch Filed Under: Eat Local, Recipes Tagged With: baking, balsamic, eating local, fruit, pie, recipe, strawberry

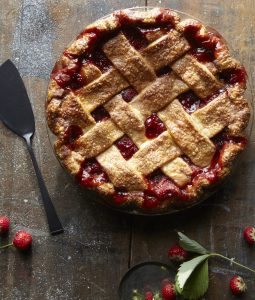
Let’s be honest — Whether you’re a fan of sweets or not, who doesn’t love pie? Four & Twenty Blackbirds has become a staple in the Gowanus neighborhood for both their savory and sugary concoctions. Owners Melissa and Emily, who learned the tricks of the trade from their Grandma Liz, got their start building custom pies out of their Brooklyn apartment before establishing a flagship location in 2010. Now, Four & Twenty Blackbirds is easily the top spot in Brooklyn for pies. 

As the weather slowly warms, the time proves to be more than perfect for a fruit pie. The ladies have shared their recipe for the Strawberry Balsamic Pie for us, whose combination of strawberries and balsamic vinegar prove to make for an overall mouthwatering, satisfying treat.

Makes one 9-inch pie

Serves 8 to 10

Ingredients

¼ cup plus 3 tablespoons granulated sugar

2 pounds fresh strawberries, rinsed and quartered (5 to 6 cups)

1 small baking apple (such as Northern Spy or Golden Delicious)

2 tablespoons balsamic vinegar

2 dashes Angostura bitters 

¾ cup packed light brown sugar

3 tablespoons ground arrowroot 

2 grinds fresh black pepper, fine setting

½ teaspoon kosher salt

Egg wash (1 large egg whisked with 1 teaspoon water and a pinch of salt)

Demerara sugar, for finishing

Recipe

· Have ready and refrigerated one pastry-lined 9-inch pie pan and pastry round or lattice to top (see page TK).

· Sprinkle 3 tablespoons of the granulated sugar over the strawberries. Stir gently to combine and allow the fruit to macerate at room temperature for 30 minutes to 1 hour.

· Peel the apple and shred on the large holes of a box grater. Drain the strawberries of excess liquid and combine with the shredded apple. Sprinkle on the balsamic vinegar and Angostura bitters.

· In a separate bowl, mix together the remaining ¼ cup granulated sugar, brown sugar, arrowroot, black pepper, and salt. Gently fold the sugar mixture into the strawberry mixture. Pour the filling into the refrigerated pie shell, arrange the lattice or pastry round on top, and crimp as desired.

· Chill the pie in the refrigerator for 10 to 15 minutes to set the pastry.

· Meanwhile, position the oven racks in the bottom and center positions, place a rimmed baking sheet on the bottom rack  and preheat the oven to 425°F.

· Brush the pastry with the egg wash; if your pie has a lattice top, be careful not to drag the filling onto the pastry (it will burn). Sprinkle with the desired amount of demerara sugar.

· Place the pie on the rimmed baking sheet on the lowest rack of the oven.  Bake for 20 to 25 minutes, or until the pastry is set and beginning to brown. Lower the oven temperature to 375°F, move the pie to the center oven rack, and continue to bake until the pastry is a deep golden brown and the juices are bubbling throughout, 35 to 40 minutes longer.

· Allow to cool completely on a wire rack, 2 to 3 hours. Serve slightly warm or at room temperature.

· The pie will keep refrigerated for 3 days or at room temperature for 2 days.


Filed Under: Eat Local, Recipes Tagged With: baking, balsamic, eating local, fruit, pie, recipe, strawberry

Detox with Kichadi

April 21, 2014 By admin Leave a Comment Filed Under: Recipes

photo by Jan Warren
photo by Jan Warren

What comes to mind when you hear the word cleanse? A fast, kale juice for a week, or The Master Cleanse? Many cleanses these days ask that you move away from solid food and drink something consistently for a period of time. By taking away anything difficult to digest, the body reserves energy from over working hard to break down foods and makes room for any toxins to leave the body.

Spring cleaning: Remove clutter not only from your apartment but from your body as well. As the air starts to warm up and the days get continuously longer, this is an ideal time to rid the body of any residual winter toxins.

But let’s shift our perspective: Instead of taking things away, how can we be more mindful about what we are feeding our bodies? Times of fasting and detox can be a time to tune in with what your body can do without and commit to integrating wholesome, energetic foods. Let food be your medicine.

Kichadi is a primary Ayurvedic meal that has been prescribed for centuries for its many healing properties. It can be eaten when one feels they are about to get sick, are sick, or looking to detoxify the body. These meals are simple and can be made in one pot!

Simplicity is key here, as the organs do not have to work as hard and can receive nourishment more directly. Your liver is going to experience the most change during the spring, so let’s be kind to it.

Traditionally, kichadi calls for a grain and a legume with the mixture of medicinal oils and spices. Basmati rice and mung beans cooked with ghee (clarified butter) and spices such as coriander, cumin, and turmeric make up a classic kichadi dish. But you can make a kichadi specific to the season and for any ailment you are trying to address. This basic kichadi outline also gives you the freedom to experiment with different combinations of grains, legumes, oils, and spices.  Additionally, adding fresh, seasonal vegetables at any point of the cooking process can amp up your kichadi powers.

Allow your liver to take it easy and stay away from alcohol, caffeine, meat, dairy, gluten, and white sugar. I am all about moderation, so try it for a weekend and if you are feeling good, try five days and then maybe seven days. Make yourself a big pot of kichadi to have for all meals. Again, moderation. If that seems crazy to you, try to have your kichadi for lunch and/or dinner.

While keeping it simple, this spring-appropriate recipe nourishes you and keeps you satisfied. The white rice has a cleansing property by literally scraping the organs clean.  Brown rice can be used for more everyday consumption. The red lentils offer the necessary protein to keep you going. Ginger heats up the body to inspire purification and build immunity. Turmeric acts as an antiinflammatory, proven to be especially helpful with allergies. Cumin seeds are found in almost every kichadi recipe, as they are a great aid for digestion and assisting the absorption of necessary vitamins and minerals.


Spring Kichadi serves 2

3 cups of water
1/2 bunch of leafy greens (anything seasonal: escarole, bibb lettuce, spinach, etc)
3/4 cup of red lentils
1/2 white onion, finely chopped
1/2 cup of basmati white rice
1/2 cup of asparagus or zucchini, chopped
1 teaspoon of olive oil
1 teaspoon of fresh ginger, finely chopped
1 teaspoon of turmeric
pinch of cumin seeds
sea salt & black pepper to taste

Rinse rice and lentils until water runs clear.  In a large, stainless steel pot, heat the olive oil over medium heat. Add the cumin seeds, ginger, and turmeric, and toast until fragrant. Add the onion and sauté until translucent, then add the lentils and rice and sauté for about 2 more minutes. Next, add 3 cups of water, increase heat, and bring to a boil. Cover and reduce to a low simmer for about 20 minutes. Add your asparagus or zucchini (or both!), making sure there is enough water to steam the veggies. Cover and cook for 5 minutes. Add the leafy greens and incorporate them into the contents of the pot. Add a little more water if too dry. Cover and let cook for 5-10 minutes depending on heartiness of greens. Season with sea salt and pepper to taste. Leftovers? Just reheat in a pan and add some new spices to freshen it up. Enjoy!

Filed Under: Recipes

Chilled Watermelon Tomato Soup

July 19, 2013 By admin Leave a Comment Filed Under: Eat Local, Recipes

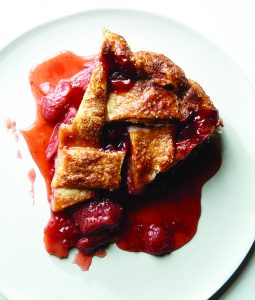
You know the perfect melon when you read one—food writers are hopelessly poetic in the face of hyper-seasonal food.   But what happens when the food we pay homage to falls short of expectations? What do we do when perfectly ripe produce is anything but?

Few things are as disappointing as a mealy piece of fruit, particularly if you’ve waited all year for it.
Of course, you chance disappointment when buying a single piece of fruit, but with a huge watermelon, say, your gamble is greater. The good thing is, your options expand, too. The following recipe is my recent rescue work of watermelon that sat too long in the fridge. Of course, the soup is even better with watermelon at its prime.

One last note: don’t think about letting the rind go to waste. At Purple Kale Kitchenworks, we find delicious ways of using parts of food that we’d otherwise throw away. We use the white part of the watermelon rind in a salad with corn, green pepper, olive oil, and cumin. We substitute this same rind for cucumber in a white gazpacho, with almonds, sherry vinegar, bread, and herbs. We use it on its own for granita, mixed with lemon and cardamom syrup. We even pickle the tough, green part of the rind alone for snacks and for a salad with cured meats, red onion, and parsley vinaigrette. Enjoy.

Serves 4 to 6

3 tablespoons or more of extra virgin olive oil
1 small red onion, finely diced, about ½ cup
1 small watermelon (about 2 pounds) cut in indiscriminately thick slices
2 pounds ripe tomatoes
1–2 teaspoons salt
1 tablespoon or more sherry vinegar
5 or 6 large mint leaves, julienned
1 jalapeno pepper, seeded, minced
1 tablespoon capers, minced
1 teaspoon lemon juice

Heat a couple of tablespoons of oil in a medium sauté pan over medium-high heat. Add onion and cook, stirring frequently, until onion is completely tender and lightly browned. Season lightly with salt.

Meanwhile, place a large-holed grater over a large bowl. Grate the melon directly into the bowl, down to the rind. Pick out the black seeds. Do the same with the tomatoes. Discard the core, if it is large, woodsy, and tasteless. You may be left with tomato skins that resist grating. Toss those into the bowl, too, or reserve them for draping over garlic-rubbed, grilled bread.

When onions are cooked, add them to the tomatoes and watermelon. Season with 1 teaspoon salt and the vinegar. Add 1 tablespoon of olive oil and stir gently. Let sit another few minutes, then adjust the salt, vinegar, and oil to taste.

For the garnish:
Combine the mint, jalapeno, capers, and lemon juice in a small bowl. Add oil until a salsa consistency. Serve, spooned over the individually-portioned soup.


Recipe courtesy of Purple Kale Kitchenworks www.purplekale.com. Copyright, Purple Kale Kitchenworks, 2013

Filed Under: Eat Local, Recipes

Vinaigrette for Boiled Spring Vegetables

March 23, 2012 By admin Filed Under: Recipes

I’m thrilled to share this gift of spring, a recipe philosophy by Tamar Adler, author of the recently released An Everlasting Meal: Cooking with Economy and Grace (Scribner, October 2011).  Simply put, Tamar is one of the most beautiful and inspiring people that I have ever met; her love of olive oil, herbs and life is contagious, and her kitchen prose, so eloquently expressed during a Ger-nis Culinary class, mesmerized me.  Tamar, her book, and more, will win you over too at tamareadler.com.  To new inspiration! Best, Destin

There’s no better time to learn from your own cooking than spring.

Spring vegetables–like little radishes and turnips and potatoes and lettuces–don’t need much done to them other than to be simply boiled or eaten raw, maybe with a mustardy vinaigrette alongside or mixed through.

How little cooking you need to do to spring ingredients gives you a perfect opportunity to pay close attention to each small act of cooking you do: each time you slice a fresh, barely acidic spring radish from its muddy leaves you can take the time to notice where it makes the most sense to separate the plucky little root. When you touch its cut side to salt, you can take note of how much salt a raw radish needs in order to taste perfectly seasoned.

After you’ve paid enough attention to your small vegetable trimming and salting, use the quiet simplicity of spring ingredients to get really good at making vinaigrette. Once you are, it becomes second nature, and throughout the rest of this season, and the next, making a vinaigrette is often the only cooking, other than cutting and salting, there is to do.

A young spring or summer boiled or raw vegetable tossed with vinaigrette is a taste of the season itself. Here is a recipe for a big batch of mustard vinaigrette with instructions on how to pay attention so that you can learn how to make vinaigrette as you go, instead of learning how to follow a recipe for one.

Vinaigrette for boiled spring vegetables
• 1-2 cloves of garlic
• somewhere in the neighborhood of a ¾ tablespoon salt
• around 1/4 red onion or a shallot, finely diced
• about 1-1 1/2 tablespoons red wine vinegar
• about tablespoons Dijon mustard
• 4-5 tablespoons olive oil

Slice an onion or shallot in half through its root, then dice it. The easiest way to do this is to lay a half cut side down, slice it, parallel to the cutting board, a few times almost all the way to the root, then make a hatched pattern, again leaving the root intact, directly down toward the board, and then carefully cutting off the resulting tiny pieces. If the pieces seem big, make a pile of them and chop them until they’re suitably small. Put the onion or shallot in a small bowl.

Peel the clove of garlic, then pound it to a paste with a little salt in a mortar and pestle or on your cutting board. I recommend starting with one clove of garlic, and then deciding next time you make it or the one after, whether you want to try it with two. Add it to the onion or shallot.

Add the red wine vinegar to your garlic and onion. Use a measuring spoon, but notice what a tablespoon juice ends looks like once you’ve tipped the spoon into the bowl. Also notice how much of it’s taken up by the volume of onion or shallot.

Do the same with the salt. Use a measuring spoon, but then pour that into the palm of your hand. Anyone who’s ridden a bike knows that muscle memory’s good—it may take more than one batch of vinaigrette for you to learn to salt by touch, but you’ll be much closer than you were before.

Let those ingredients sit together for a few minutes, then add the mustard, mixing it through well. Taste this. It’s the most important moment to taste a vinaigrette: even this concoction of vinegar, mustard, raw onion, and garlic should taste “good,” but strong, assertive, vaguely salty. Taste it with your finger. It’s helpful if you notice whether it’s thick or thin, watery, viscous.

Add the olive oil in the same way. Measure it, then notice how much it is in relationship to the other ingredients. Whisk it in, or just mix it well with a spoon. It doesn’t have to all be uniform. Once it’s all mixed together, taste it on its own, then drag a vegetable leave through it, and taste it that.

If this seems like a lot of attention to pay to one dressing, remind yourself that what you’re doing is taking and giving a class at the same, and also that you’re getting good at the only really important skill to have during hot months.


Destin Joy Layne is program director of Sustainable Table at GRACE Communications Foundation where she works to create positive social change throughout our food system. The program is also home to EatWellGuide.org, a national free online directory and mapping tool for finding fresh, locally grown food, and TheMeatrix.com, the critically acclaimed award-winning film and the most successful web advocacy campaign in history.

Destin coauthored the publication Cultivating the Web: High Tech Tools for the Sustainable Food Movement and has been featured on Jus Punjabi television yoga.

Visit SustainableTable.org, Facebook.com/SustainableTable, and Twitter.com/eatsustainable to learn more about the issues of sustainable agriculture, eating organic, buying locally, and the hazards of industrialized food.

Filed Under: Recipes

Two Sides of the Taste Buds

December 22, 2010 By admin Filed Under: Recipes

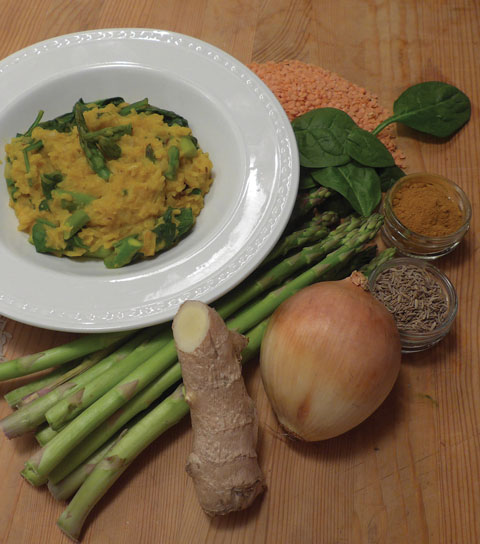
With its bright orange flesh and sweet flavor, butternut squash is an ideal ingredient for sweet and savory dishes. Rich in vitamins A and C, it is also a good source of fiber, potassium and magnesium. Choose squash that is free of blemishes, firm, and with a long neck. Perfect for a chilly weekend, pick up a fresh, local squash from the Saturday green market at Grand Army Plaza.  Fresh seasonal produce can also be found at Union Market.


THAI COCONUT SQUASH SOUP – Serves 4
A perfect antidote to winter, this soup combines coconut milk and Thai red curry with creamy butternut squash. Adjust spice level to suit your palate. Stop by Blue Apron Foods and pick up some butternut squash seed oil. Intense and nutty, this oil provides a great finish for this recipe.

3 tablespoons canola oil
1 large or 2 small onions, chopped
3 cloves garlic, chopped
1 large butternut squash, peeled,seeded and diced
3 1/2 cups chicken or vegetable stock
1 1/2 cups coconut milk
Thai red curry paste, to taste
Salt, to taste

Heat oil in a large pot. Add onions and cook till soft, about 5 minutes. Add garlic, then squash and toss. Add stock, coconut milk and 1 ½ teaspoons curry paste. You can add more paste after soup is puréed, if desired. Cover and cook for 35 minutes, or until squash is very tender. Purée till very smooth, taking care working with the hot liquid. Return to heat, season with salt and add more paste, if needed. Garnish with a drizzle of butternut squash seed oil.


BUTTERNUT SQUASH CLAFOUTI – Serves 8
Best described as a baked pancake, clafouti is a great cold weather dessert. Served warm, it is a cinch to put together and can be prepped in advance ensuring an easy assembly at the end of a meal. We’ve added roasted hazelnuts and crushed amaretti cookies to give texture to the silky base. Save prep time by using canned organic butternut squash purée from Union Market.

3/4 cup butternut squash purée
5 large eggs
3/4 cup sugar
1/2 cup whole milk
1/2 cup heavy cream
1 teaspoon vanilla extract
Pinch salt
1/4 cup all-purpose flour
1/3 cup chopped toasted hazelnuts
1/3 cup crushed amaretti cookies
Unsalted butter and sugar to prepare baking dish

If preparing squash purée, preheat oven to 350 degrees. Cut squash in half lengthwise, remove seeds, and place cut side down on a foil-lined baking tray. Roast for 1 1/2 hours, or until flesh is very tender. When cooled, scoop out flesh and purée till very smooth. Transfer to a cheese cloth-lined sieve and let drain for 1 hour.  Squeeze gently to remove excess liquid then measure 3/4 cup of the purée. In a food processor combine purée, eggs, sugar, milk, cream, vanilla, salt, and flour. Blend until smooth. Pass through a fine sieve and let rest for 1 hour. At this point you could refrigerate the batter for up to 24 hours. When ready to bake, brush a 9 inch pie plate with softened butter and sprinkle with a little sugar. Spread toasted hazelnuts and amaretti cookies on pie plate. Slowly pour batter over the nuts and cookies. Bake at 425 degrees for 12 minutes and then lower temperature to 375 degrees and bake for another 15 minutes, or until the middle is just set and does not jiggle when the pan is moved. Serve immediately, on its own or with ice cream.

Filed Under: Recipes

Primary Sidebar

The Spring 2025 Issue is now available

The Reader Community

READER CONTRIBUTORS

Copyright © 2025 · Park Slope Reader